
Flutterでダイアログを出してフォーム入力を行う方法を解説します。
FlutterでDialogを出す方法
Dialogの表示にはshowDialog関数を使用します。builderプロパティにDialog内に表示したいものをコーディングします。
showDialog(
context: context,
barrierDismissible: false, // dialog is dismissible with a tap on the barrier
builder: (BuildContext context) => new AlertDialog(
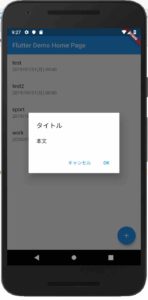
title: new Text("タイトル"),
content: new Text("本文"),
// ボタンの配置
actions: <Widget>[
new FlatButton(
child: const Text('キャンセル'),
onPressed: () {
Navigator.pop(context, _DialogActionType.cancel);
}),
new FlatButton(
child: const Text('OK'),
onPressed: () {
Navigator.pop(context, _DialogActionType.ok);
})
],
),
)
この例だとこのようなダイアログが出ます。
DialogでFormを使う方法
Dialogでフォームを表示するにはExpand使用します。
builder: (BuildContext context) {
String title = '';
DateTime limitDay = null;
return AlertDialog(
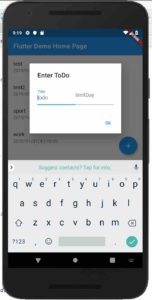
title: Text('Enter ToDo'),
content: new Row(
children: <Widget>[
new Expanded(
child: new TextField(
autofocus: true,
decoration: new InputDecoration(
labelText: 'Title', hintText: 'todo'),
onChanged: (value) {
title = value;
},
)),
],
),
actions: <Widget>[
FlatButton(
child: Text('Ok'),
onPressed: () {
Navigator.of(context).pop(title);
},
),
],
);
},
FormでDateTime Pickeを使う方法
さらにフォーム入力に日時入力を使うにはDateTime Pickerを使用すると簡単に実装できます。pudspec.yamlに下記を追加します。
dependencies:
  flutter_datetime_picker: ^1.2.1
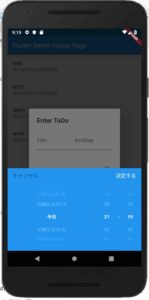
新しくExpandを追加します。onTap内に記述することで入力フォームをタップした時にDateTime Pickerを表示するように設定できます。
import 'package:flutter_datetime_picker/flutter_datetime_picker.dart';

new Expanded(
    child: new TextField(
        autofocus: true,
        decoration: new InputDecoration(
            labelText: 'limitDay', hintText: 'date'
        ),
        onTap: () {
        DatePicker.showDateTimePicker(context,
            showTitleActions: true,
            theme: DatePickerTheme(
                backgroundColor: Colors.blue,
                itemStyle: TextStyle(
                    color: Colors.white, fontWeight: FontWeight.bold),
                doneStyle:
                TextStyle(color: Colors.white, fontSize: 16)),
            onChanged: (date) {
                print('change $date in time zone ' +
                    date.timeZoneOffset.inHours.toString());
            }, onConfirm: (date) {
                print('confirm $date');
            }, currentTime: DateTime.now(), locale: LocaleType.jp);
        },
    ))
それぞれの入力フォームはこのようになります。
まとめ
ダイアログは簡単に実装できますが、サンプルコードが少なくすんなり実装できないのでこういった機能別のサンプルコードをどんどんアップしていきます。
The following two tabs change content below.


髙妻智一
2013年CyberAgent新卒入社
スマホゲームを作る子会社に所属し、サーバーサイドのエンジニアを担当。2年目の終わりから新規子会社の立ち上げに参加し、サーバーサイドのエンジニアリーダーとしてサービースのリリースから運用までを担当。
2018年仮想通貨のスマホウォレットを提供するGinco Incにブロックチェーンエンジニアとして入社。
最新記事 by 髙妻智一 (全て見る)
- Polkadot(Substrate)のアドレスとトランザクションについて - 2023-03-09
- 【無料公開】「Goで始めるBitcoin」3章 Bitcoinノードとの通信 技術書典8 - 2020-03-08
- エンジニアがゼロから技術ブログを書くための方法をまとめました - 2019-05-25


コメントを残す